How To Replace HP Elitebook 8760W 8760P 8770W 8770P Keyboard 701978-001 701455-001
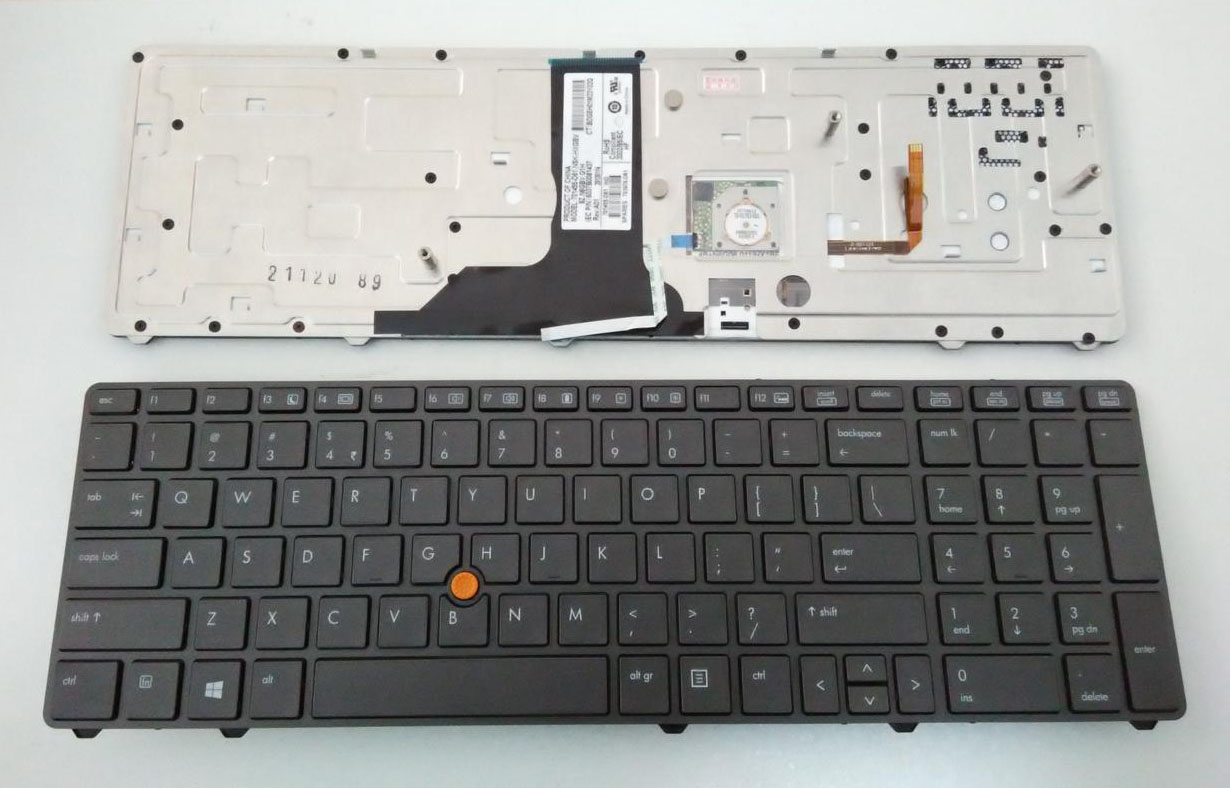
Original NEW HP Elitebook 8760W 8760P 8770W 8770P Keyboard US Black 701455-001 701978-001
$
64.66
Layout: US
Condition: Original Brand New
Color: Black
Type: With Pointstick & Backlit
Regulatory Approval: CE,UL
Warranty: 3 Months
Availability: in stock
Payment | Delivery: PayPal | HongKong Registered Air Mail With Tracking Number
Free Shipping to Worldwide range!
Condition: Original Brand New
Color: Black
Type: With Pointstick & Backlit
Regulatory Approval: CE,UL
Warranty: 3 Months
Availability: in stock
Payment | Delivery: PayPal | HongKong Registered Air Mail With Tracking Number
Free Shipping to Worldwide range!
Compatible Code
638514-001 652554-001 701455-001 701978-001 9Z.N6GBV.601
SG-45300-XUA
SG-45300-XUA
Fit Model
Elitebook 8760P Series Elitebook 8760W Series Elitebook 8770P Series Elitebook 8770W Series
More compatible and detailed information, please refer to our website HP Elitebook 8760P Keyboard.
More compatible and detailed information, please refer to our website HP Elitebook 8760P Keyboard.
How to replace HP Elitebook 8760W 8760P 8770W 8770P laptop keyboard
Before disassembling the HP Envy 14, follow these steps:
1. Shut down the computer. If you are unsure whether the computer is off or in Hibernation, turn the computer on, and then shut it down through the operating system.
2. Disconnect all external devices connected to the computer.
3. Disconnect the power from the computer by first unplugging the power cord from the AC outlet and then unplugging the AC adapter from the computer.
4. Remove the battery
Replace HP HP Elitebook 8760W 8760P 8770W 8770P Keyboard-1
Replace HP HP Elitebook 8760W 8760P 8770W 8770P Keyboard-3
Replace HP HP Elitebook 8760W 8760P 8770W 8770P Keyboard-5
|
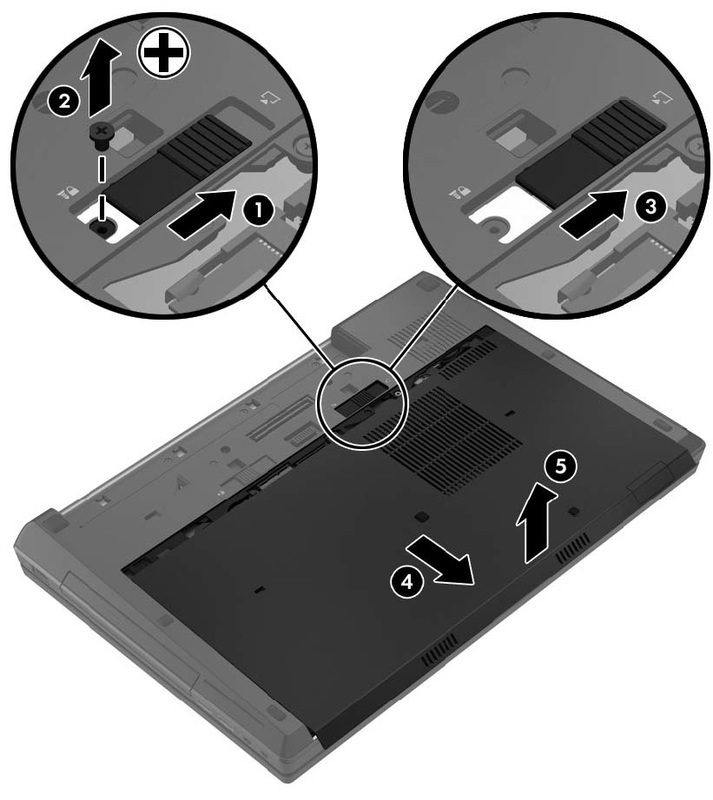
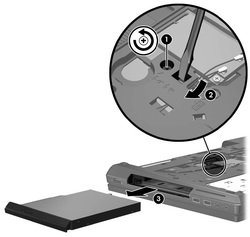
Remove the service access cover:
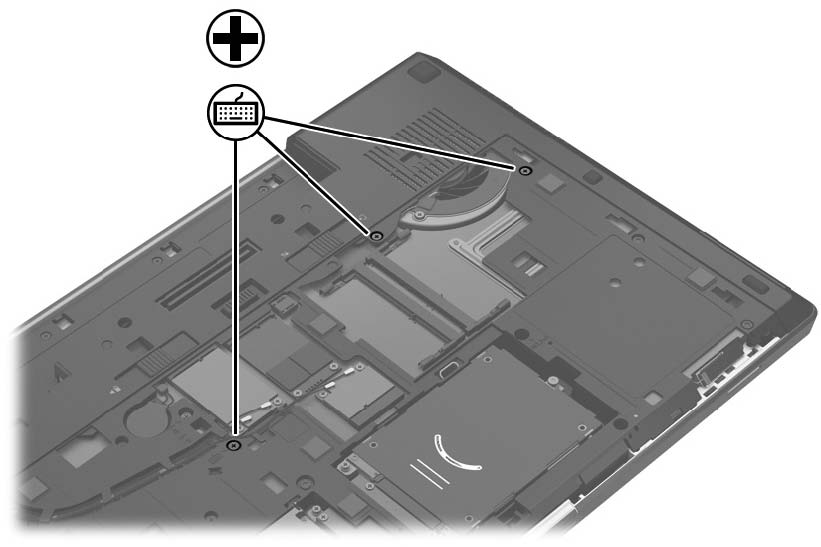
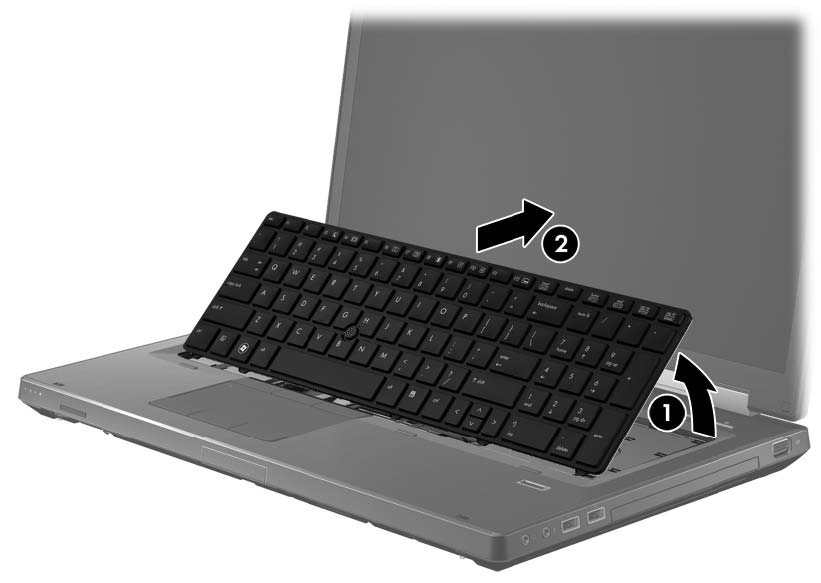
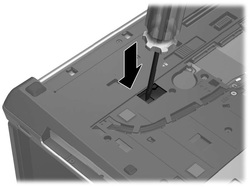
1. Position the computer upside down on a flat surface, with the front toward you. 2. Slide the service cover release latch to the right (1), and remove the single security screw (2), if it has been installed. 3. Slide the service access cover release latch to the right (3) to release the service access cover. 4. Slide the service access cover toward the front of the computer (4) and then remove the cover (5). Remove the optical drive: 1. Position the computer with the front toward you. 2. Loosen the Phillips captive screw (1) that secures the optical drive to the computer. 3. Insert a flat-bladed screwdriver or similar tool into the optical drive tab access (2) and press the tab to the left to release the optical drive from the computer. 4. Remove the optical drive (3). Remove the keyboard: 1. Position the computer with the front toward you. 2. Loosen the three Phillips captive screws that secure the keyboard to the computer. 3. Position the computer on its side with the display open at a 90 degree angle. 4. Insert a small tool at an angle through the hole in the optical drive bay at an angle to push out the top edge of the keyboard. This gives you access to the back of the keyboard and releases the top edge of the keyboard. NOTE: Make sure that the optical drive or upgrade hard drive have been removed before performing this procedure. 5. Turn the computer right-side up, with the front toward you. 6. Open the display as far as it will open. 7. Lift the top edge (1) of the keyboard until it rests at an angle. 8. Slide the keyboard back toward the display (2). 9. Release the keyboard ZIF connector (1) and lift the keyboard cable (2) to release it. 10. Release the pointing stick ZIF connector (3) and lift the cable (4) to release it. Reverse this procedure to install the HP Elitebook 8760W 8760P 8770W 8770P laptop keyboard. |
Replace HP HP Elitebook 8760W 8760P 8770W 8770P Keyboard-2
Replace HP HP Elitebook 8760W 8760P 8770W 8770P Keyboard-4

Replace HP HP Elitebook 8760W 8760P 8770W 8770P Keyboard-6
|